Lab 3 - Creating branches and merging
What are Branches?
Branches allow someone to work on a project without changing existing code.
Example: You have a project with a working website. If you want to add a new feature to the website, you would create a branch which is a replica of the project for you to work with.
A good practice is to keep the master branch as a working version of the software, and create a branch for developing individual features.
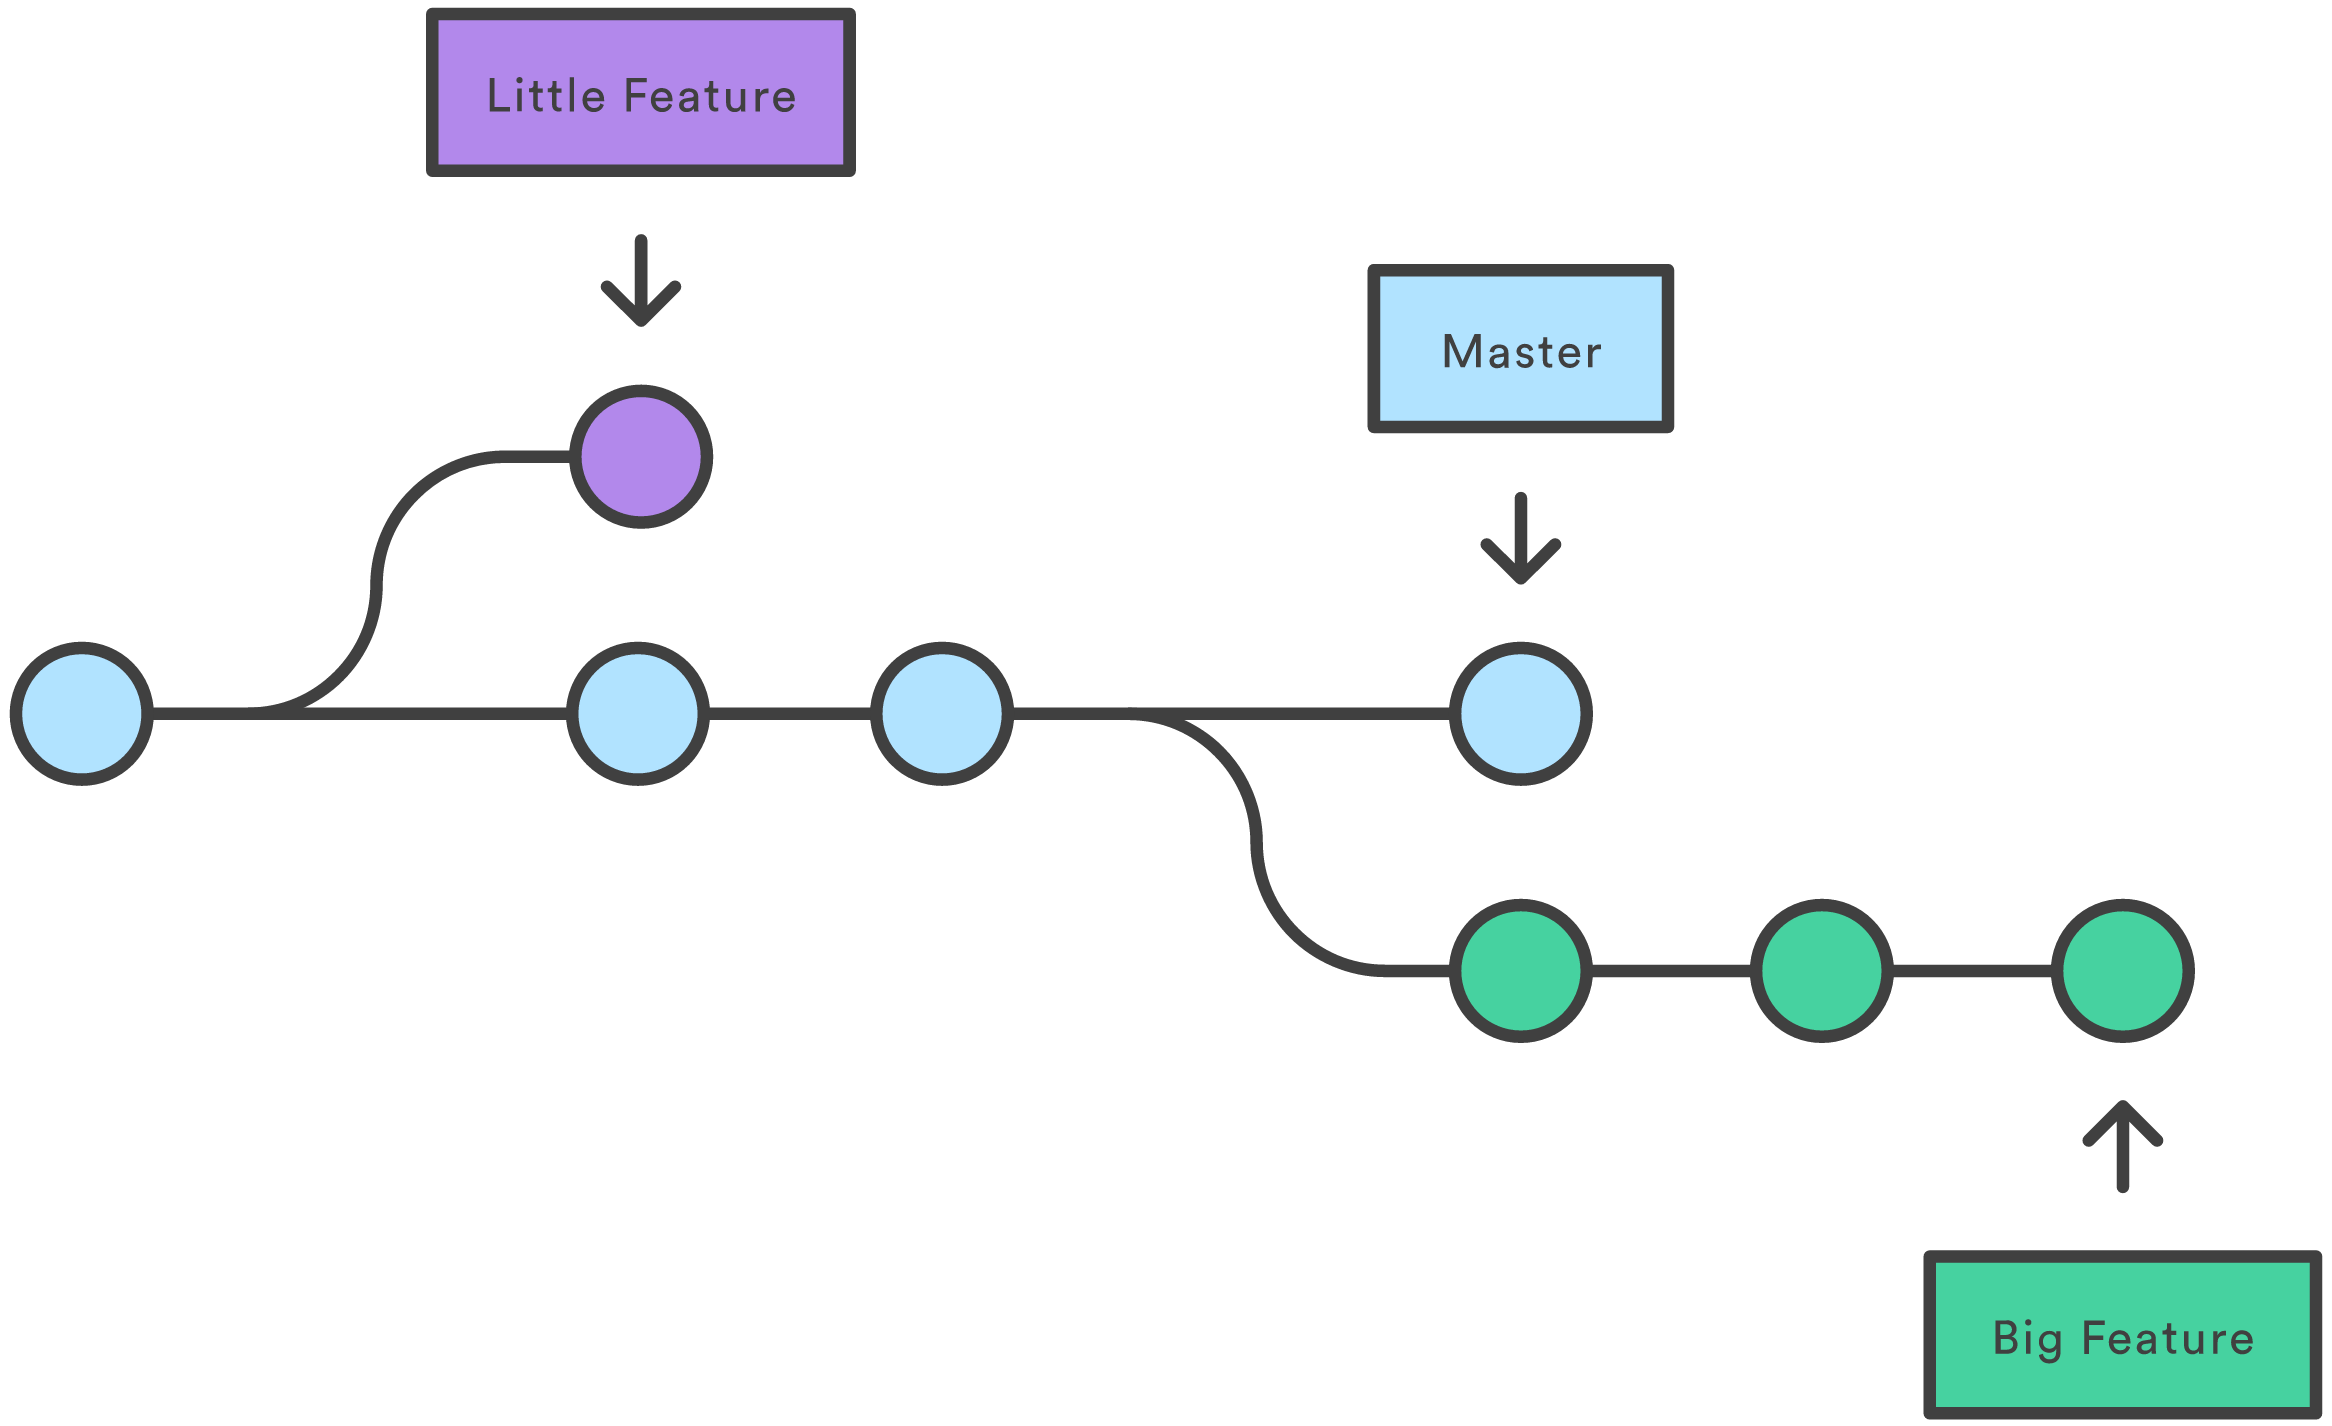
The following branch names are reserved:masterandgh-pages.gh-pagesis a branch for a project’s GitHub page (website).masteris the default branch of a repository.Below is an visual to illustrate branches where each node is a commit.
Commands used in this lab
git branch - lists all branches on local machine and shows what is the current working branch
git checkout -b branchname - creates a new branch with the specified branch name using the current branch as the base
git checkout branchname - switches to the specified branch, work that is not committed with not be saved
git merge branchname - merges the specified branch into the current working branch, merges are one-way operations
Step One
In the terminal or git shell, use the command, git branch, to see that there is only one and it is the master branch.
git branch

* master
Step Two
Create a new brach called foreign-languages with the command git checkout -b foreign-languages.
Using git branch again shows that there are now two branches and the one you are working in is foreign-languages.
git branch

* foreign-languages
  master
When creating a new branch or switching to a different branch, all untracked work is transferred over to the new branch; however, it is a bad practice to rely on this functionality. So, make sure to commit or stash your work before switching branches.
Step Three
Edit the file languages.txt by adding any foreign languages that you know, if you don't know any foreign languages include a language that you might want to learn. Make sure to include a label for the types of languages (this will help simulate conflicts later in the lab). You can also remove the line of text added from lab 2 if you wish.
Example: path/to/repo/languages.txt
programming languages:
    python
    javascript
    c++

foreign languages:
    french
Save the file.
Step Four
Now add and commit the changes with a descriptive commit message, such as add foreign languages. Feel free to look back at lab 1 for reference.
Also push this new branch to GitHub with git push --set-upstream origin foreign-languages. The --set-upstream option tells git where to send future pushes, this is only necessary when making the first push of a new branch. Run git help push to learn more.
If you look on the GitHub website, you should now be able to see the new branch.
git add languages.txt
git commit -m "add foreign languages"
git push --set-upstream origin foreign-languages
Step Five
To simulate another person working on the project, or if there is a situation that require work on a more pressing feature, you are going to create another branch. Before branches will edit the same file to show how merging works.
First, switch back to the master branch since when creating a branch, it uses the current working branch to branch off of. To switch to the master branch use the command, git checkout master.
Using git branch will show that the current branch is master.
git branch

  foreign-languages
* master
Step Six
Create a new branch called language-strength. To create the branch use the command, git checkout -b language-strength.
Using git branch will now show three branches with the selected one being language-strength.
git branch

  foreign-languages
* language-strength
  master
Step Seven
Edit the file languages.txt by adding an indicator of how well you know it. Add either weak, average, or strong next to each language. You can also remove the line of text added from lab 2 if you wish.
Example: path/to/repo/languages.txt
python - strong
javascript - strong
c++ - weak
Save the file.
Step Eight
Now add and commit the changes with a descriptive commit message, such as add language strength. Feel free to look back at lab 1 for reference.
Also push this new branch to GitHub with git push --set-upstream origin language-strength. The --set-upstream option tells git where to send future pushes, this is only necessary when making the first push of a new branch. Run git help push to learn more.
If you look on the GitHub website, you should now be able to see the new branch.
git add languages.txt
git commit -m "add language strength"
git push --set-upstream origin language-strength
Step Nine
Now there are two branches with features that need to be merged into the master branch. First, switch back to the master branch with git checkout master. Running git branch will verify it.
git branch

  foreign-languages
  language-strength
* master
Step Ten
To merge the foreign-languages branche into master use the command, git merge foreign-languages. The merge will be done automatically by git since there weren't any changes to the master branch since foreign-languages was created. If a text editor comes up in terminal, use ctrl+x to accept the default message for the merge.
git merge foreign-languages
Merge made by the 'recursive' strategy.
 languages.txt | 10 ++++++----
 1 file changed, 6 insertions(+), 4 deletions(-)
First merge done
Step Eleven
Now, merge the language-strength branch with git merge language-strength. This time there will be conflicts because the languages.txt was editted by both branches.
git merge language-strength
Auto-merging languages.txt
CONFLICT (content): Merge conflict in languages.txt
Automatic merge failed; fix conflicts and then commit the result.
Running git status will show which files have conflicts.
On branch master
Your branch is ahead of 'origin/master' by 2 commits.
  (use "git push" to publish your local commits)
You have unmerged paths.
  (fix conflicts and run "git commit")

Unmerged paths:
  (use "git add <file>..." to mark resolution)

    both modified:   languages.txt

no changes added to commit (use "git add" and/or "git commit -a")
Step Twelve
Resolving conflicts
When there is a conflict, git adds several lines into your file to indicate where the conflicts are. Git uses the lines
<<<<<<< HEAD,=======, and>>>>>>> branchnameto tell you which changes were from each branch.
- Anything between the
<<<<<<< HEADand=======lines is content from the branch that you are merging into (the master branch in this example)- Anything between the
=======and>>>>>>> branchnamelines, is content from the branch that you specified ingit merge branchname(the language-strength branch in this example)Resolving conflicts can be done in three ways, and it is up to the person merging to decide
- Only use the code from the branch merging into: the code between
<<<<<<< HEADand=======- Only use the code from the branch merging from: the code between
=======and>>>>>>> branchname- Rewrite the section of code
Make sure to delete the
<<<<<<< HEAD,=======, and>>>>>>> branchnamelines afterwards
Here is what the languages.txt file will look like after git detected the conflict:
<<<<<<< HEAD
programming languages:
    python
    javascript
    c++

foreign languages:
    french
=======
python - strong
javascript - strong
c++ - weak
>>>>>>> language-strength
To resolve the conflict, keep the foreign languages and add the language strength to all languages.
Example: path/to/repo/languages.txt
programming languages:
    python - strong
    javascript - strong
    c++ - weak

foreign languages:
    french - weak
Save the file.
Step Twelve
After the conflict has been resolved, the merge can be completed. The changes to make the resolve are currently untracked, so the changes need to be added and then committed. The commit message should include a notification of the merge.
git add languages.txt
git commit -m "Merge branch 'language-strength'"
Finally the merges can be pushed to GitHub with a git push. Check on the GitHub website to verify.
Lab 3 complete: Congratulations you have successfully creating some branches and merged them together!